
It is a standard accounting procedure to reconcile your accounts to ensure there is no discrepancy between your BillQuick Online bank registers and actual bank statements. BillQuick Online provides an easy reconciliation feature to balance your accounts with your bank statements. For example, reconcile your bank, credit card, equity or current liability account with the corresponding bank statement, credit card bill, and so on. Performing reconciliation in BillQuick Online is straightforward because most of the data is already in your register. You can quickly enter information from your statement (say, ending balance, charges and interest), clear your checks and deposits, and print a report when you have successfully reconciled.
The Reconcile Accounts screen records all the checks written, deposits made and bank charges incurred in BillQuick Online. It then allows you to compare these recorded transactions with your bank or credit card statements, confirm whether checks have cleared and identify discrepancies.
The following are descriptions of fields on the Reconcile Accounts screen:
Choose Account
Please Choose an Account to Reconcile:
You must select an account to be reconciled from this drop-down list, say a bank account. The date when this account was last reconciled displays.
Statement Details
Statement Date:
To reconcile your account with a corresponding statement, you must select the statement's date from the drop-down calendar.
Beginning Balance:
Displays the beginning balance of your account. You need to check this balance in BillQuick Online against the starting/opening balance on the statement. The first time you do reconciliation, the beginning balance is zero.
Ending Balance:
This is the ending balance of the
statement being used for reconciliation. For example, the ending balance
from the bank statement or credit card bill. You can also click ![]() to insert the running balance
of the selected account from its register and check it against the ending
balance on the statement.
to insert the running balance
of the selected account from its register and check it against the ending
balance on the statement.
Enter Any Service Charge or Interest Earned
While reconciling your bank accounts, you must provide details about the related income earned or expense incurred. Your bank statement lists interest and bank service charges.
Service Charge:
This is a service charge specified on the bank statement (such as, standard monthly charges). You must specify the Date on which the charges were assessed and also an Account used to post service charges. You should create an expense account for this, if not already done.
Interest Earned:
The amount of interest earned on your account as specified on the statement. You must specify the Date on which the interest was calculated and also an Account used to post interest earnings. You should create an income account for this, if not already done.
Enter Any Finance Charge
While reconciling your accounts such as credit card or equity, you must provide details about the related finance charges.
Finance Charge:
This is a finance charge specified on the statement (such as, credit card bill). You must specify the Date on which the charges were assessed and also an Account used to post finance charges. You should create an expense account for this, if not already done.
 You must click Next to
move to the next page.
You must click Next to
move to the next page.
The grids and fields displayed on the screen vary depending upon the type of account chosen for reconciliation. Reconciling is easier if you sort the data to match the way your bank arranges the statement. All the transactions that are on your bank statement are cleared transactions, meaning that missing transactions have not cleared.
Checks and Payments Marked Cleared:
This list displays all the checks written and electronic payments made since your last reconciliation. It also includes checks that haven't yet been cleared by the bank since the last bank statement. You must select the check box for each transaction that has a matching transaction on the statement (make sure the amounts match). This grid is available for accounts such as checking and savings bank account.
Deposits and Other Credits Marked Cleared:
This list displays all the deposits and other credits received since your last reconciliation. You must select the check box for each transaction that has a matching transaction on the statement (make sure the amounts match). This grid is available for accounts such as checking and savings bank account.
Charges and Cash Advances Marked Cleared:
This list displays all the charges and cash advances made since your last reconciliation. You must select the check box for each transaction that has a matching transaction on the statement (make sure the amounts match). This grid is available for accounts such as credit card, current liability, equity, and so on.
Payments and Credits Marked Cleared:
This list displays all the payments and credits recorded since your last reconciliation. You must select the check box for each transaction that has a matching transaction on the statement (make sure the amounts match). This grid is available for accounts such as credit card, current liability, equity, and so on.
You
can add any transactions you forgot by opening that register and entering
the transactions. When you return to the Reconcile Accounts screen, the
new transactions are automatically added and you can clear them here.
Current Reconciliation
This section displays the current reconciliation amounts. As you clear the transactions in the grid, these values get updated accordingly.
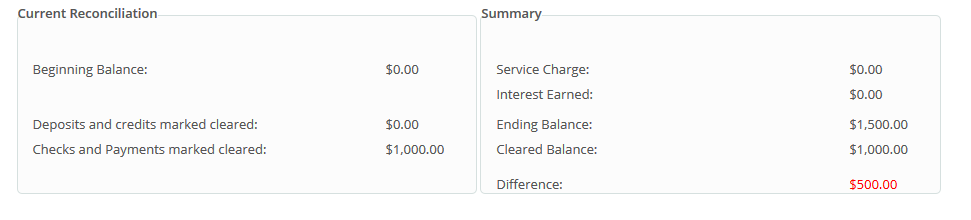
Summary
This section displays the totals for service/finance charges and interest earned. In addition, it also displays the ending and cleared balances with any difference between those two values. The calculations are:
Cleared Balance = Amount Cleared + Interest Earned
Difference = Ending Balance - Cleared Balance
If the difference is $0, everything is accurate and you are ready to reconcile the accounts now. If the difference is not $0, you have to figure out the inaccuracy and correct it. In that case you can choose to reconcile later.
Reconcile Accounts Button Panel
Help:
Opens the BillQuick Online Help in the Reconcile Accounts section.
Print:
Clicking on this button displays a list of in-context reports that you can preview and print.
Undo Last:
Cancels the last action taken, including any incomplete or draft reconciliations.
Next:
When clicked, it takes you to the next page where you can clear all the transactions and reconcile the accounts. You can also view a summary of the reconciliation.
Reconcile:
You can choose to Reconcile Now or Reconcile Later. If the difference in the balances is $0, you are ready to reconcile the accounts now. You can print the reconciliation report. If the difference is not $0, you can choose to reconcile later. BillQuick Online saves the information and settings for the future. You can also force BillQuick Online to enter a journal entry for the difference using the Auto Adjust option when prompted.
Refresh:
Retrieves the latest data from the database and displays it on the screen.
Back:
When clicked, it takes you back to the previous page where you can specify the account and statement options.